The trim begins!
Well it is a lot harder to trim a horses feet then you think. Ya the farrier does it quick and fast. Well when your new and not really sure what the heck your doing, it takes about an hour and a half. I did not really know how to use my tools either. The nippers where the easiest to use. The rasp takes some getting use to, the harder you press the less it moves. So my husband and I just laughed and kept at it.
Here is how she looks before and after. I was very conservative with what I did. Sassy was pretty good about the hole thing. I have to get her use to standing with a leg on the stand.
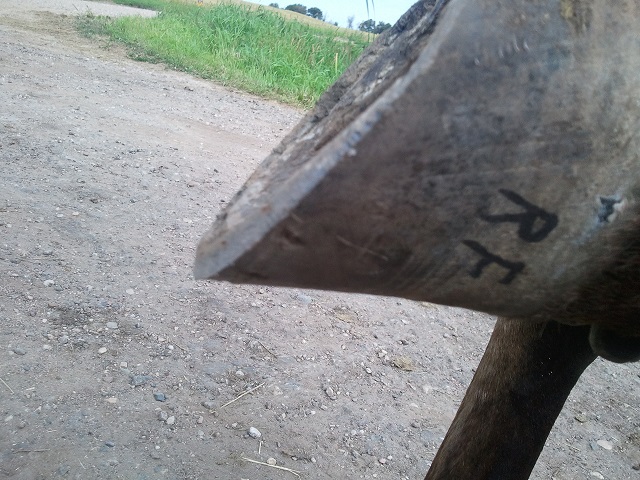
Below is the right front before the trim.

Below before trim.

Cleaned up bars and sole.

Trimmed height above the sole. Evened out heels to what I think is 1/4 inch above sole. Sassy has always had the crack in her frog. I have treated it with no thrush this last summer and winter. but It never has got better. I am hopping that going barefoot will make this foot more healthy and fix this crack.

Here is my first bevel. I was very generous with leaving hoof wall. I think I could have made my angle steeper. I tried to start my bevel 1/4 inch in front of the sole ridge. I think I could have started it closer to the ridge but I am not sure. I will have to study more.

Another picture of the same bevel.
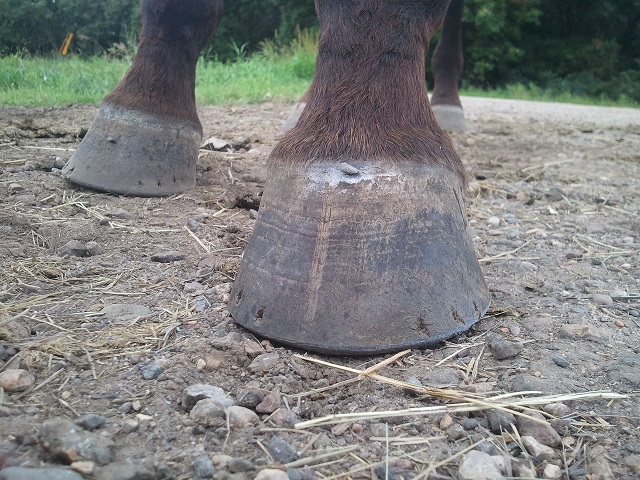
Below is the side view after the trim.

Below is before the trim.

From these 2 pictures above you can tell I did do something. The distance from the bottom of the hoof and the nail holes is smaller. I for got to get front views.
Below is before the trim on the left front.

I cleaned up the bars and sole. Rasped down to what I see as 1/4 above the sole. I made sure the heels where even. It is very different when you get your hands on the hoof. That hoof wall is wider then you think it is. The 45* bevel does not thin the hoof wall at all, It just takes off that toe.

Beveling the left front.

Below is the side view before the bevel. This heel looks very long. I had a hard time getting these heels flat because this one is so forward.

This bevel does not look like I took much off. I think I will start the bevel back farther next time and make it steeper. I don't think I have the 45* down. Just a note when you switch side on the horse you have to learn how to use the rasp all over again!

Below is before trimming.

After the trim.

I remembered to get a front view on the last hoof. I was not sure I had done very much until looking at these top view pictures. You can really tell the nail holes are lower.
Below is the right hind.

Cleaning up the sole.

I missed a picture of lowering the hoof wall. Here is the bevel.

Does not look like I did much bevel on this one. You can see the sole ridge where the toe wants to be. I need more practice. I did not want to make her sore so I took the less is more and a little is better approach. I think with more practice the better I will get.

Side views before and after.

Side view after trimming.

Below is Sassy's Left hind foot. You will remember that this is the foot that she cut off the outside (right side in the photo) heel bulb. You can see the deformity. You can also tell how the frog has filled in that space to keep the hoof usable. Also on that right side heel bar the hoof has chipped so there was nothing to rasp down. I can tell I really need more practice. Looking at these pictures I can see where I need to trim more.


When you are holding the hoof you have that moment to decide what needs to be done. I need to REALLY STOP and LOOK at the hoof. Being able to view the picture for as long as you need, you can really see where I need to improve my eye and my trim.
I think on the above Sole views I need to trim height above the sole a bit more off those quarters. They where even when I was done. I don't like how they flare out.
Here is after the trim and bevel. I can see from this view I did not do a very good bevel. Practice, practice, practice! I will get better. I think I will have my farrier come out in 8 weeks or so to check how I am doing. He does agree with the barefoot trimming theory.


Before and after side views. It looks funny because I brushed away the gravel to see the bottom edge of the hoof. The front toe angle does not look changed much but the heel angle looks better in the after picture to me.


Here is Sassy and I trotting down the dirt road after her trim.
Thanks everyone I hope you learn something from this blog.
I think you did good for your first trim. Your bevel was shallow, but it's fine. I'm surprised Sassy didn't break off anything on her own, even the nail holes. She must have very strong hoof wall!
ReplyDeleteThank you Maureen. I know I need more practice. That will come with time. Mean while I will keep studying everything I can.
DeleteWe have had some rain so I have not been riding out of the arena. That could be why nothing chipped off also. It could be the sweet North Dakota farm ground is very soft on her hooves!
Well done Tam! It takes some gumption to put yourself out there with limited experience, and pictures too!! Bravo. You will get slicker and faster so don't worry it won't always take you an hour and a half ;-)
ReplyDeleteAnd before you know it you'll be right at home with your rasp. Me, I'm nipper phobic, ha ha.
I agree with Maureen's philosophy of going steady, You can take more off but you can't out it back on!
Good look to you and Sassy. I'm going to follow the HGM starting this weekend and see where it takes us!
Look forward to hearing more from you.
Catherine
Thank you for your support Catherine. Good luck with your HGM journey. I hope you have great success! I would love to see some pictures of your progress.
Delete